BK BREWERY STATUS

MOOD AT THE BREWERY: GETTING READY TO BREW AGAIN.....
PRIMARY FERMENTER #1: EMPTY
PRIMARY FERMENTER #2: EMPTY
SECONDARY FERMENTER #1: EMPTY

SECONDARY FERMENTER #2: EMPTY
TAP #1: EMPTY

TAP #2: EMPTY
TAP #3: EMPTY
TAP #4: EMPTY
TAP #5: EMPTY
TAP #6: EMPTY
TAP #7: EMPTY
TAP #8: EMPTY

BREW LIST:
BK "BRIANER" HEFFEWEIZEN: 10 GALLON BATCH
BK BLONDE ALE: FIRST 10 GALLON BATCH

CHOCOLATE MARSHMALLOW STOUT: CHRISTMAS TIME
CALAMANSI HEFFEWEIZEN: FOR MY FILIPINOS


BK BREWERY BREW HISTORY ON BOTTOM OF PAGE
Showing posts with label Brewing. Show all posts

Monday, August 17, 2009

JUST ARRIVED BK BREWERY PINT GLASSES, $5 EACH!


Just arrived, BK BREWERY pint glasses for sale $5 each! These glasses feature the BK BREWERY logo designed by the owner and operator of the BK BREWERY, me. A special thanks to my graphic designer/ sister Jessica for cleaning up the logo and formatting it in illustrator, it was a big help.

The tiger logo was chosen for its symbolism of determination "the eye of the tiger" which is very important at the BK BREWERY which is determined to continually improve and make the best tasting brews. Also because i like tigers, they are bad ass, and i had a tiger stuffed animal when i was a kid. These glasses are 16oz. Libbey pints which feature the highest standard glass material, and the safe edge rim & foot guarantee. Also you'll be happy to know these pints are made in the U.S.A

So if you're going to enjoy a pint of delicious BK BREW, what better way to hold it than to pour it into your very own BK BREWERY pint glass! Cheers!

If you would like one please contact me, either by comment on this blog post, facebook, or e-mail my gmail account, with the quantity you want and i will bring them the next time i see you, don't forget your paper Lincolns, and thank you so much for your support!

As always, we here at the BK BREWERY want to remind you to enjoy responsibly!

Wednesday, June 10, 2009

LIKE A PROUD FATHER

So today I attended my brew club meeting and brought my newest blueberry honey wheat beer there for sampling. Now the club I joined is “The Strand Brewers Club” SBC for short, they are the local club in the area, and a bunch of great guys and girls who are as passionate about brewing as I am. Also they have a number of members who are BJCP certified and in fact a man by the name of Jim W. who is rated as one of the top 40 judges in the U.S. So my blueberry honey wheat beer is fairly green, ass it was brewed a month ago and has only been aging for about a week. But I bottled one and brought it to the meeting to see if anything was wrong with it such as off flavors or recipe formulation or anything that might be wrong with it. These guys are incredible they were basically able to read my recipe back to me while only tasting the beer. “Oh so you use some crystal malt eh?” holy crap! I only used .5 lb whish is hardly any for a 5 gallon batch. Anyways so their tasting notes were great constructive criticism, but the main thing was the beer was good! They actually liked it, and thought it was a good beer Jim was the only one who tasted that I used blueberry flavoring not actual blueberry as he said he could taste the chemical-ness of the extract flavoring and while it wasn’t bad he just said he could tell I used flavoring as opposed to the real fruit. He was the only one who detected that all the others liked it and thought it was a good brew, one guy actually said I should add more flavoring; which I think I will do to get more blueberry across. So what does all this mean? Well it means a lot to me, after I poured the first sample I was nervous as the first day of school, this was it, time to see if I actually know what I am doing and my brewing process is sound enough to produce good quality beer. After the first sip I cringed a little waiting for the critique, and with a nod the first words were “this is good” and a wave of relief swept over me. Then I started pouring for everyone who wanted a sample trying to hit the BJCP certified members for more feedback. After the first 22 ouncer emptied it was unanimous, it’s a good brew! Like a proud father I stood there with such a sense of accomplishment and pride in my work it overwhelmed me. Now I didn’t cry but inside I wept a little J what a feeling to know that all this money, time, effort, and money I put into this hobby is actually worth it and my process is sound and appeals to beer aficionados is amazing. It makes me want to brew more and brew crazier. The hardest part is having sound practices and sound processes to make good beer, it takes attention to details cleanliness, and sanitation. So now having this information and knowing I’m doing the right thing and my stuff is legit I am enthused, I am excited, and I am invigorated into making more, better, and tastier brews! May ALL of you one day enjoy a BK brew!

Sunday, February 15, 2009

HOW TO MAKE AN IMMERSION WORT CHILLER

How to make a dual coil Immersion wort chiller

So the time comes in every starting brewer’s operation where ice buckets and partial boils don’t cut it anymore, and its time to do full boils and experiment with the many aspects of home brewing. And from that the need arise for a way to get their wort cooling faster. (wort is beer before you add the yeast) So the question was brought up “how do I want to cool my wort?” There are many options out there; there are immersion chillers, counter flow chillers and plate style chillers, but which one is right for me? Based purely on ease of component acquisition, assembly, and cleaning I decided I wanted an immersion chiller. Now many question come up after that, what type of metal, what size tubing, how long, configuration, make or buy? I looked at the many available options online and in my local brew shop but didn’t find the style of wort chillers I wanted. I did find one that had many features I wanted but it was oversized for my brew pot and too tall. So the choice was relatively easy I was going to make my own wort chiller. Recently copper tubing has risen in price to astounding levels almost making it equally priced as stainless steel tubing. But stainless steel is still slightly more expensive AND is not as efficient in transferring the heat as copper which is what you want for trying to get the heat out of your wort, so I decided to buy copper tubing. What size? Well a lot of the online ones made for 5 gallon batches were made from 3/8” copper tubing usually 25’ in length. Since I was already going with a 50’ coil I decided to make mine out of 1/2” because I figured with the longer coil and the design I wanted the more water volume would benefit me. I also noticed a lot of the chillers only had a large outer coil and I thought I could build a better one with a dual coil design. The basic idea behind this is simple where is the hottest part of the beer, in the center. So why would you put you main cooling element on the perimeter? My question exactly. So I wanted to build a one piece dual coil wort chiller out of refrigeration grade 1/2” copper tubing 50’ or so in length and here is how I did just that.

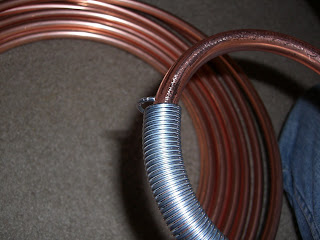
First I gathered all my materials I needed a 50’ coil of ½” refrigeration grade copper tubing, a form for the inner and outer coils, and a pipe bending spring as to prevent kinking which is incredibly easy to do with copper tubing. Now I was originally against purchasing the pipe bending springs because I thought I didn’t need them, but if I could recommend anything it would be to suck up and buy one because you’ll see later it pays for itself almost instantly. Oh I almost forgot you wil also need your favorite beverage to enjoy while working as this will take some time, way more time then I had planned on the inner coil alone, but it is worth it. So here’s everything laid out

Now I used a 4” diameter piece of PVC pipe and the form for my inner coil, I got extremely lucky that I picked 4 “ as this was probably the tightest coil possible using the spring set as it kept binding on this diameter any smaller and it wouldn’t have worked. So basically I started by straightening out about 2.5’ of copper to bend over the edge of the pot and to attach to my inlet and outlet hoses. Then I made a roughly 90 degree bend and started forming it to the PVC pipe.

I noticed immediately this was going to take a while as the spring had a hard time bending the tight diameter and I was constantly having to massage it around the bends. Shortly after I finished my first full bend I got a little anxious and tried to go faster. Big mistake. I had the spring slightly ahead of the bend point on the pipe and soon I pushed to form it to the pipe…KINK! $#@#!$%# expletive!

Seeing my mistake I just bent the pipe back and forth a few times till it broke off and started again now the length had been cut to about 47 feet. See my reasoning for the spring benders it was worth it! Also I noticed the spring bender was scratching my pipe! So I remedied that problem as well at this time by taking the end of the spring and flaring it out to prevent that last sharp edge form dragging along the pipe and scratching the snot out of it.
So basically the second time around I took my time and made sure the spring was covering the bend point of the tubing at all times while forcing it around the PVC pipe. And I worked my way down the pipe, basically bending a few inches at a time, removing the PVC pipe, advancing the spring, replacing the pipe and bending the next few inches, until I reached about 9 inches in height on my center coil (my brew pot is 11inches deep).

Slowly but surely I worked my way to this after about 1.5 hours

And now the hard part was over! Look at the beautiful results! So my inner coil was done now I need a roughly 10-11” diameter outer coil and enough tubing left over to run the exit over the edge. I had originally planned on using a form for the outer coil as well but quickly realized without bending the straight piece I could fit it down on the coil in the proper place so I decided to free hand the outer coil. It made me nervous too because if I kin it here I mine as well throw the entire thing away and start over wasting all my hard work, time, and money. So basically I started a larger coil and measured it and adjusted it until it both centered my inner coil and measured 10.5 inches diameter. Then I just started slowly working may way up the rest of the coil constantly checking to make sure the coil was straight and maintaining diameter. I fount the larger diameter I was able to move much quicker as the spring would slide much easier around the tubing. I literally completed the out coil in 20 minutes.

Then when I had about 2.5 feet left of tubing I bent another 90 matching it up with the inlet tube. I got lucky they both ended up in the same position on the coils.

So after about 2 hours and 1 blister on my index finger from spinning the spring to advance it on the 4 inch inner coil I had a finished wort chiller.

So now all that’s left is to make sure it fits how I want it to inside my brew pot. And it fit perfectly inside my brew pot. I also spent a little time spacing the coils a bit and elevating a lot of them towards the top since that’s where the most heat is. It’s all about efficiency!

PERFECT!

All that’s left to do is hose clamp on an inlet and outlet hose onto their respective ends, and my wort should be cooling in no time flat! Plus I do get a sense of accomplishment since I built it myself just remember take your time!

BK BREWERY BREW HISTORY

  • BK NO BULL PILSER
  • BK "BRIANER" HEFFEWEIZEN
  • BK "BRIANER" HEFFEWEIZEN
  • BK IMPERIAL PUMPKIN PORTER
  • BK DOUBLE BARREL ALE
  • BK CREAM ALE
  • BK BELGIAN TRIPPEL
  • BK LESSONS LEARNED IPA 1.5
  • SWEET CELMENTINE HEFFEWEIZEN
  • BK BROWN ALE
  • STRAWBERRY BLONDE
  • BLUEBERRY HONEY WHEAT
  • PIMPIN PALE ALE
  • RED SOX RED ALE
  • TRUE BREW IRISH STOUT
  • TRUE BREW HEFFEWEIZEN