
Tuesday, April 13, 2010
BK BREWERY Temporarily Down.........
As sad as it is, the BK BREWERY is temporarily shutting down operations while it searches for a new home. There might be a rogue series brew or two but nothing that substantial during this time. Thank you for you continued support and i will let you know as soon as i begin brewing again in the BK BREWERY!

Monday, August 24, 2009
BK BREWERY UPGRADES AND NEWS
So this weekend was a busy weekend for the BK BREWERY. On Friday the biggest beer to date was brewed, the BK BELGIAN TRIPPEL. Everything went super smooth for this brew and the brew system is starting to work like a well oiled machine. Also on last Tuesday i (along with the help of a friend for the circuit board) finally finished my homemade magnetic stir plate, pictures coming soon. this was used to create the yeast starter for the Belgian trippel. On Saturday the BK BREWERY posted an ad on craigslist selling one of the 50 lb co2 cylinders i had bought. I purchased two 50lb co2 cylinders and an older regulator for $100, then sold one 50 lb co2 cylinder (the crappier looking one) and the regulator for $120 so i got a 50 lb aluminum co2 cylinder for free plus 20 bucks! Then on Sunday the BK BREWERY invested in its future by buying a 15.5 gallons stainless steel keg for $40 that it plans to convert into a brew kettle. This gives the BK BREWERY the ability to produce 15 gallon batches of each brew. Most likely BK BREWERY would only produce 5-10 gallon batches but versatility is always coveted. now to figure out how to clean up the keg and cut the top off and add spigots and thermometers, and stuff. ANOTHER project for the BK BREWERY........
Till next time..................
Till next time..................
Monday, August 17, 2009
JUST ARRIVED BK BREWERY PINT GLASSES, $5 EACH!

Just arrived, BK BREWERY pint glasses for sale $5 each! These glasses feature the BK BREWERY logo designed by the owner and operator of the BK BREWERY, me. A special thanks to my graphic designer/ sister Jessica for cleaning up the logo and formatting it in illustrator, it was a big help.
The tiger logo was chosen for its symbolism of determination "the eye of the tiger" which is very important at the BK BREWERY which is determined to continually improve and make the best tasting brews. Also because i like tigers, they are bad ass, and i had a tiger stuffed animal when i was a kid. These glasses are 16oz. Libbey pints which feature the highest standard glass material, and the safe edge rim & foot guarantee. Also you'll be happy to know these pints are made in the U.S.A
So if you're going to enjoy a pint of delicious BK BREW, what better way to hold it than to pour it into your very own BK BREWERY pint glass! Cheers!
If you would like one please contact me, either by comment on this blog post, facebook, or e-mail my gmail account, with the quantity you want and i will bring them the next time i see you, don't forget your paper Lincolns, and thank you so much for your support!
As always, we here at the BK BREWERY want to remind you to enjoy responsibly!
Monday, July 20, 2009
DIY CARBONATOR CAPS

DIY CARBONATOR CAPS
Many of you saw these caps I built, and many asked how to make them and what they were. So here you go, build your own!
Here’s what I did
1.) Gather materials. Here’s what you’ll need.
a. Soda bottle caps
b. An awl or a punch
c. Drill & 19/64” drill bit (whatever size your valve stems are)
d. Tire valve stems
e. Sealing washer (optional)
2.) Punch a centering hole in the bottle cap.
3.) Drill hole in cap same diameter as shank on valve stem. Clean up plastic burs with a knife.
4.) Insert valve stem and secure with sealing washer and nut. I only used a sealing washer because the nut supplied with these valve stems had a small diameter and it allowed the top of the cap to flex a little, so I put a washer to stiffen it and seal the top, probably it’s not needed but eh I’m building them not you! :-P.
5.) Enjoy your own carbonator caps!
6.) My cost and where purchased.
a. Soda bottle caps – Who doesn’t have any of these lying around? If not ask a friend!
b. Stainless steel valve stems – these I purchased on eBay 5 for $25 shipped, so $5.00 each. You could use aluminum or probably even the rubber pull through style to save money, I just like stainless and everything else in my brewery is stainless why skimp here?
c. 5/16” Sealing washers – home depot, 4 for $.88 cents yeah sucks to buy 2 bags to get 5 but what are you going to do?
d. Time – 1 hour
GRAND TOTAL
5 caps
$26.76 - total
$5.22 - each
Many of you saw these caps I built, and many asked how to make them and what they were. So here you go, build your own!
Here’s what I did
1.) Gather materials. Here’s what you’ll need.
a. Soda bottle caps
b. An awl or a punch
c. Drill & 19/64” drill bit (whatever size your valve stems are)
d. Tire valve stems
e. Sealing washer (optional)
2.) Punch a centering hole in the bottle cap.
3.) Drill hole in cap same diameter as shank on valve stem. Clean up plastic burs with a knife.
4.) Insert valve stem and secure with sealing washer and nut. I only used a sealing washer because the nut supplied with these valve stems had a small diameter and it allowed the top of the cap to flex a little, so I put a washer to stiffen it and seal the top, probably it’s not needed but eh I’m building them not you! :-P.
5.) Enjoy your own carbonator caps!
6.) My cost and where purchased.
a. Soda bottle caps – Who doesn’t have any of these lying around? If not ask a friend!
b. Stainless steel valve stems – these I purchased on eBay 5 for $25 shipped, so $5.00 each. You could use aluminum or probably even the rubber pull through style to save money, I just like stainless and everything else in my brewery is stainless why skimp here?
c. 5/16” Sealing washers – home depot, 4 for $.88 cents yeah sucks to buy 2 bags to get 5 but what are you going to do?
d. Time – 1 hour
GRAND TOTAL
5 caps
$26.76 - total
$5.22 - each

You can get the commercial carbonator caps online for $15 + shipping or for $20 + tax at the homebrew shop. They are all plastic and they only fit 1 type of bottle. With these DIY carbonator caps you can modify them to fit any cap whether it be a Costco sized 3 liter bottle or the 1 liter Aquafina bottle, or to pressurize a growler for longer shelf life in the fridge, or if you’re like me you can start pressurizing everything! OJ, juicy juices, milk, anything with a cap big enough for the valve stem! Warning carbonated milk is a BAD idea…..trust me.
PART 2
Then many of you asked me if I had a special tank of CO2 to pressurize these caps with? Nope, all you have to do is splice one of your CO2 lines coming off your tank. I added a distributor valve so I can shut off lines when not in use but it could be as simple as splicing it with a “T”. My initial setup has dual regulators, with one side having only 1 line so I modified that one with the distributor valve and a standard air chuck. See pictures.


Wednesday, June 10, 2009
LIKE A PROUD FATHER
So today I attended my brew club meeting and brought my newest blueberry honey wheat beer there for sampling. Now the club I joined is “The Strand Brewers Club” SBC for short, they are the local club in the area, and a bunch of great guys and girls who are as passionate about brewing as I am. Also they have a number of members who are BJCP certified and in fact a man by the name of Jim W. who is rated as one of the top 40 judges in the U.S. So my blueberry honey wheat beer is fairly green, ass it was brewed a month ago and has only been aging for about a week. But I bottled one and brought it to the meeting to see if anything was wrong with it such as off flavors or recipe formulation or anything that might be wrong with it. These guys are incredible they were basically able to read my recipe back to me while only tasting the beer. “Oh so you use some crystal malt eh?” holy crap! I only used .5 lb whish is hardly any for a 5 gallon batch. Anyways so their tasting notes were great constructive criticism, but the main thing was the beer was good! They actually liked it, and thought it was a good beer Jim was the only one who tasted that I used blueberry flavoring not actual blueberry as he said he could taste the chemical-ness of the extract flavoring and while it wasn’t bad he just said he could tell I used flavoring as opposed to the real fruit. He was the only one who detected that all the others liked it and thought it was a good brew, one guy actually said I should add more flavoring; which I think I will do to get more blueberry across. So what does all this mean? Well it means a lot to me, after I poured the first sample I was nervous as the first day of school, this was it, time to see if I actually know what I am doing and my brewing process is sound enough to produce good quality beer. After the first sip I cringed a little waiting for the critique, and with a nod the first words were “this is good” and a wave of relief swept over me. Then I started pouring for everyone who wanted a sample trying to hit the BJCP certified members for more feedback. After the first 22 ouncer emptied it was unanimous, it’s a good brew! Like a proud father I stood there with such a sense of accomplishment and pride in my work it overwhelmed me. Now I didn’t cry but inside I wept a little J what a feeling to know that all this money, time, effort, and money I put into this hobby is actually worth it and my process is sound and appeals to beer aficionados is amazing. It makes me want to brew more and brew crazier. The hardest part is having sound practices and sound processes to make good beer, it takes attention to details cleanliness, and sanitation. So now having this information and knowing I’m doing the right thing and my stuff is legit I am enthused, I am excited, and I am invigorated into making more, better, and tastier brews! May ALL of you one day enjoy a BK brew!
Tuesday, June 9, 2009
LOOK AT ME I"M A BREWMASTER
So my friend set up his camera to take a picture every 4 seconds while i brewed, then made a video of the shots. it stopped taking pictures before transfer to the fermenter and pitching the yeast, but this is pretty sweet and we'll do another for other brews.
THE BACKGROUND MUSIC IS HILARIOUS!
Saturday, June 6, 2009
MY FIRST YEAST STARTER FOR A BROWN ALE
So here it is, my first yeast starter for an OG 1.076 brown ale I'll be brewing on sunday. made 1800ml of starter with a gravity of ~1.050, its a little higher than the 1.040 standard but for higher gravity beers such as this brown ale i have read and i'm hoping the slighty higher gravity starter will not shock the yeast when they get in the wort of 1.076.

Why make yeast starters?
The quantity of yeast in a Wyeast "smack pack" typically isn't anywhere near enough to give you a fast, healthy fermentation. That's why it is a good idea to make a starter. The idea behind making a yeast starter is to provide the small number of yeast cells from a Wyeast package with an ideal environment in which they can build up their health and numbers, with no competition from other competing microbes. Then, when the contents of the starter are pitched into your wort, you will get a shorter lag time, and a faster fermentation. This in turn will result in a cleaner tasting beer, and reduce the chances of infection, because your yeast will take over quickly, leaving little time for unwanted microbes to gain a foothold.
Even the "pitchable" liquid yeasts (e.g. Wyeast XL packs, and White Labs vials) will benefit from a starter, especially if the yeast is more than a couple of months old, or will be pitched into a high gravity (> 1.070 OG) wort.
The quantity of yeast in a Wyeast "smack pack" typically isn't anywhere near enough to give you a fast, healthy fermentation. That's why it is a good idea to make a starter. The idea behind making a yeast starter is to provide the small number of yeast cells from a Wyeast package with an ideal environment in which they can build up their health and numbers, with no competition from other competing microbes. Then, when the contents of the starter are pitched into your wort, you will get a shorter lag time, and a faster fermentation. This in turn will result in a cleaner tasting beer, and reduce the chances of infection, because your yeast will take over quickly, leaving little time for unwanted microbes to gain a foothold.
Even the "pitchable" liquid yeasts (e.g. Wyeast XL packs, and White Labs vials) will benefit from a starter, especially if the yeast is more than a couple of months old, or will be pitched into a high gravity (> 1.070 OG) wort.
Tuesday, May 12, 2009
WINNER'S OF THE NEXT BREW POLL
You asked for it and you got it, my next brews and brew for the big long beach COL will be my sweet Clementine heffeweizen, and my very own BK Brown Ale. i hope you all are at least half as excited as i am! the brown ale should have a ABV of around 9% but it'll be a sneaker because of all the different exotic sugars, such as brown sugar, molasses, Belgian Candi sugar, and maple syrup. it will be well balanced with 3 different hops and taste delicious! The heffeweizen will also be very fruity and delicious, the ABV will be around 4.8% it will be crispy, and i'll be using a grain called cara hell, don;t be fooled by the name this grain is light a delicous and will give this brew a light a creamy head, maybe also throw in some crystal 10L for a sweeter note, and balance it out with 2 different hops. These brews will be some pretty darn good brews, i hope you will enjoy them
As always enjoy responsibly (especially with the brown ale its a doosy!)
As always enjoy responsibly (especially with the brown ale its a doosy!)
Monday, May 4, 2009
WINNER OF NEXT BREW POLL: HEFEWEIZEN

With the most votes a hefeweizen will be brewed now its time to pick the style of the style :-) 4 choices and as much information as I could provide.
1.) Widmer Bros. Clone
Description: widmer bros. clone. Typical American style hefe.
2.) "Sweet Clementine" Hefeweizen
Description: A fruity hefeweizen, light and finishes clean, brewed with real clemetines and named after the song "sweet caroline" which is traditionally sung at every home red sox game in the middle of the 8th inning.
3.) Bavarian Dunkleweizen
Description: a cross between a porter and a hefe this dark wheat beer has a mild chocolate malt flavor with some smokey and spicy character.
4.) BK Brewery House Hefeweizen
Description: Should be a golden/amber, cloudy beer with a thick, clinging, fine-bubbled head that lasts all the way to the end of the glass. Aroma of vanilla and citrus fruit, along with some spicy, clovey notes typical of the style. On the palate should be smooth and creamy, with just enough sparkle to make it lively on the tongue without being too gassy and maintaining a velvety smoothness. very little sweetness and the finish should be dry, leading into a slightly hoppy, vanilla aftertaste. (Own Recipe, but took things i liked from other brews)
VOTE NOW FOR YOUR FAVORITE HEFE!
1.) Widmer Bros. Clone
Description: widmer bros. clone. Typical American style hefe.
2.) "Sweet Clementine" Hefeweizen
Description: A fruity hefeweizen, light and finishes clean, brewed with real clemetines and named after the song "sweet caroline" which is traditionally sung at every home red sox game in the middle of the 8th inning.
3.) Bavarian Dunkleweizen
Description: a cross between a porter and a hefe this dark wheat beer has a mild chocolate malt flavor with some smokey and spicy character.
4.) BK Brewery House Hefeweizen
Description: Should be a golden/amber, cloudy beer with a thick, clinging, fine-bubbled head that lasts all the way to the end of the glass. Aroma of vanilla and citrus fruit, along with some spicy, clovey notes typical of the style. On the palate should be smooth and creamy, with just enough sparkle to make it lively on the tongue without being too gassy and maintaining a velvety smoothness. very little sweetness and the finish should be dry, leading into a slightly hoppy, vanilla aftertaste. (Own Recipe, but took things i liked from other brews)
VOTE NOW FOR YOUR FAVORITE HEFE!
RUNNER UP OF NEXT BREW POLL: BROWN ALE

With the second most votes a brown ale will be brewed, now its time to pick the style of the style :-) 4 choices and as much information as I could provide.
1.) Newcastle Clone
Description: Newcastle Clone. Newcastle Brown ale is very sweet with notes of nut. No bitterness, some malt, really sweet
2.) Moose Drool Clone
Description: The name sounds a little iffy, but it's really the best Brown Ale you'll ever taste. That's why Moose Drool is far and away the best-selling beer brewed in Montana.
It's chocolate brown in color with a creamy texture. A malty beer with just enough hop presence to keep it from being too sweet. The aroma mostly comes from the malt with a hint of spice added by the hops.
3.) Indian Brown Ale
Description: A cross between an IPA and a brown ale this is a stealth beer and its higher alcohol levels are well masked by a fair amount of body. Indian Brown Ale has the color of an american brown ale, the hopiness of an IPA, and the caramel sweetness of a scoth ale.
4.) BK Brewery Brown Ale
Description: Should be nutty with a delicate roasted character finishing with a touch of malt sweetness. Well balanced hop/malt. (Own Recipe)
VOTE NOW FOR YOUR FAVORITE BROWN!
1.) Newcastle Clone
Description: Newcastle Clone. Newcastle Brown ale is very sweet with notes of nut. No bitterness, some malt, really sweet
2.) Moose Drool Clone
Description: The name sounds a little iffy, but it's really the best Brown Ale you'll ever taste. That's why Moose Drool is far and away the best-selling beer brewed in Montana.
It's chocolate brown in color with a creamy texture. A malty beer with just enough hop presence to keep it from being too sweet. The aroma mostly comes from the malt with a hint of spice added by the hops.
3.) Indian Brown Ale
Description: A cross between an IPA and a brown ale this is a stealth beer and its higher alcohol levels are well masked by a fair amount of body. Indian Brown Ale has the color of an american brown ale, the hopiness of an IPA, and the caramel sweetness of a scoth ale.
4.) BK Brewery Brown Ale
Description: Should be nutty with a delicate roasted character finishing with a touch of malt sweetness. Well balanced hop/malt. (Own Recipe)
VOTE NOW FOR YOUR FAVORITE BROWN!
Wednesday, April 29, 2009
BK BREWERY NOW HAS CABLE TV!!!!!!!!!!!!
To encourage more brewing especially during playoff season and for just all around something to watch while brewing takes place the BK BREWERY is proud to announce it has cable TV! now let the brewing never be interrupted by a sports game again, now can do both!
Friday, April 24, 2009
VOTE FOR YOUR FAVORITE BREW
Vote for you favorite style of beer in the right hand corner of this page. The 2 top voted styles will go into another poll for type and flavor of that style. these will be the brews i will bring to the Big Long Beach COL so choose wisely! and as always enjoy responsibly!
~Brew Master at the BK Brewery
~Brew Master at the BK Brewery
Monday, April 20, 2009
ICE MAKER HOOKED UP AT THE BK BREWERY
So since my kegerator HAS an ice maker i decided i should USE the ice maker, lets face it you never know when you need ice. so i also used my filtration system i built to run the water through before freezing so the ice will be more potable. had to rig up a female GHT ball valve to a 3/8" barb and just hose clamped it in the ice maker hose after cutting off orignaly compression fittings.Boom! simple and useful!
ICE HERE GET YOUR ICE!!!
ICE HERE GET YOUR ICE!!!
Friday, April 17, 2009
Next Beer Strawberry Blonde!
so after deciding to make the blueberry wheat ale, the next ingredients i ordered are for a very light and refreshing strawberry blonde. i remember liking petes strawberry blonde so hopefully it will taste as good. plus a lot of the ingredients to make "summer" beers are on sale right now so that had something to do with it too! i guess its a fruity season some lets make some fruit beers!
Tuesday, April 14, 2009
Received some brew equipment
so today i received some brewing equipment to add to the BK brewery. new pressure relief valve for my kegs cause they were old and leaky so just replaced those, new gas in and gas out posts as a backup incase one keg has an issue with either post, and a new tool i'm really excited about, a winethief. now a wine thief for those who don't know is used to draw sampled from the fermenters while using a hydrometer to check the gravity, or sugar content, of the beer. this is the only true way to measure and know the fermentation has completed. you CAN wait a certain amount of days to make sure fermentation has completed, but why wait extra time, and why not know when its done. i also recieved some carboy caps, but it hink i will just use stoppers so mayb these will be sent back.
on order i have a bunch of stoppers, a plastic racking cane, and some 5/16" id hose so i can make a makeshift counter pressure filler so i can bottle my brews from the keg, and send them to competitions, friends, and family. also still waiting for my ingredients to get here for my next wheat ale, should be here tomorrow!! and now thinking i am going to do half blueberry wheat and half strawberry kiwi wheat. just need to decide when to add the flavorings.
on order i have a bunch of stoppers, a plastic racking cane, and some 5/16" id hose so i can make a makeshift counter pressure filler so i can bottle my brews from the keg, and send them to competitions, friends, and family. also still waiting for my ingredients to get here for my next wheat ale, should be here tomorrow!! and now thinking i am going to do half blueberry wheat and half strawberry kiwi wheat. just need to decide when to add the flavorings.
Thursday, April 9, 2009
NEED TO BUILD A FERMENTING RACK
So I’ve been experiencing some beer loss when i rack from different vessels, so I decided I’m going to build a fermenting rack. Basically my theory behind this is since I need to tilt my carboys at an angle to get as much beer as I can before I start picking up sediment then why not build a rack to hold them at that angle throughout fermentation. My only current worry is whether the airlocks will work at a slight angle so I’ll need to play with that. Also whether it will have any adverse affect on the yeast, but I wouldn't think it would. But definite benefits are the yeast cake will pack tighter and out of the way in the corner and I can get better efficiency, and I won’t have to hold a full 5 gallons of beer at an angle while I transfer. This will hopefully improve the process and make things easier, I’m going to try it on the next brews and see how it works…..
BK BREWERY STATUS
Looking for the latest happening at the BK brewery? Want to know whats on tap? Wondering whats going to be brewed next?
well look no further! the blowg will be updated as changes at the BK brewery occur. check back for all the information you've been looking for!
well look no further! the blowg will be updated as changes at the BK brewery occur. check back for all the information you've been looking for!
Thursday, March 26, 2009
Quick Thought
SO i wonder if i have allergies, never seemed to bother me before but now i seem to have all the symptoms, guess i'll try some allergy medicine and see if can get rid of the runny nose, sneezing, and itchy eyes and throat. reading this might be the worst allergy season yet, man allergies suck!
Sunday, February 15, 2009
HOW TO MAKE AN IMMERSION WORT CHILLER
How to make a dual coil Immersion wort chiller
So the time comes in every starting brewer’s operation where ice buckets and partial boils don’t cut it anymore, and its time to do full boils and experiment with the many aspects of home brewing. And from that the need arise for a way to get their wort cooling faster. (wort is beer before you add the yeast) So the question was brought up “how do I want to cool my wort?” There are many options out there; there are immersion chillers, counter flow chillers and plate style chillers, but which one is right for me? Based purely on ease of component acquisition, assembly, and cleaning I decided I wanted an immersion chiller. Now many question come up after that, what type of metal, what size tubing, how long, configuration, make or buy? I looked at the many available options online and in my local brew shop but didn’t find the style of wort chillers I wanted. I did find one that had many features I wanted but it was oversized for my brew pot and too tall. So the choice was relatively easy I was going to make my own wort chiller. Recently copper tubing has risen in price to astounding levels almost making it equally priced as stainless steel tubing. But stainless steel is still slightly more expensive AND is not as efficient in transferring the heat as copper which is what you want for trying to get the heat out of your wort, so I decided to buy copper tubing. What size? Well a lot of the online ones made for 5 gallon batches were made from 3/8” copper tubing usually 25’ in length. Since I was already going with a 50’ coil I decided to make mine out of 1/2” because I figured with the longer coil and the design I wanted the more water volume would benefit me. I also noticed a lot of the chillers only had a large outer coil and I thought I could build a better one with a dual coil design. The basic idea behind this is simple where is the hottest part of the beer, in the center. So why would you put you main cooling element on the perimeter? My question exactly. So I wanted to build a one piece dual coil wort chiller out of refrigeration grade 1/2” copper tubing 50’ or so in length and here is how I did just that.
First I gathered all my materials I needed a 50’ coil of ½” refrigeration grade copper tubing, a form for the inner and outer coils, and a pipe bending spring as to prevent kinking which is incredibly easy to do with copper tubing. Now I was originally against purchasing the pipe bending springs because I thought I didn’t need them, but if I could recommend anything it would be to suck up and buy one because you’ll see later it pays for itself almost instantly. Oh I almost forgot you wil also need your favorite beverage to enjoy while working as this will take some time, way more time then I had planned on the inner coil alone, but it is worth it. So here’s everything laid out


Now I used a 4” diameter piece of PVC pipe and the form for my inner coil, I got extremely lucky that I picked 4 “ as this was probably the tightest coil possible using the spring set as it kept binding on this diameter any smaller and it wouldn’t have worked. So basically I started by straightening out about 2.5’ of copper to bend over the edge of the pot and to attach to my inlet and outlet hoses. Then I made a roughly 90 degree bend and started forming it to the PVC pipe.


I noticed immediately this was going to take a while as the spring had a hard time bending the tight diameter and I was constantly having to massage it around the bends. Shortly after I finished my first full bend I got a little anxious and tried to go faster. Big mistake. I had the spring slightly ahead of the bend point on the pipe and soon I pushed to form it to the pipe…KINK! $#@#!$%# expletive!

Seeing my mistake I just bent the pipe back and forth a few times till it broke off and started again now the length had been cut to about 47 feet. See my reasoning for the spring benders it was worth it! Also I noticed the spring bender was scratching my pipe! So I remedied that problem as well at this time by taking the end of the spring and flaring it out to prevent that last sharp edge form dragging along the pipe and scratching the snot out of it.
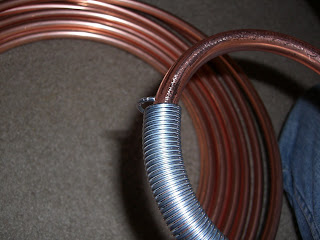 So basically the second time around I took my time and made sure the spring was covering the bend point of the tubing at all times while forcing it around the PVC pipe. And I worked my way down the pipe, basically bending a few inches at a time, removing the PVC pipe, advancing the spring, replacing the pipe and bending the next few inches, until I reached about 9 inches in height on my center coil (my brew pot is 11inches deep).


Slowly but surely I worked my way to this after about 1.5 hours

And now the hard part was over! Look at the beautiful results! So my inner coil was done now I need a roughly 10-11” diameter outer coil and enough tubing left over to run the exit over the edge. I had originally planned on using a form for the outer coil as well but quickly realized without bending the straight piece I could fit it down on the coil in the proper place so I decided to free hand the outer coil. It made me nervous too because if I kin it here I mine as well throw the entire thing away and start over wasting all my hard work, time, and money. So basically I started a larger coil and measured it and adjusted it until it both centered my inner coil and measured 10.5 inches diameter. Then I just started slowly working may way up the rest of the coil constantly checking to make sure the coil was straight and maintaining diameter. I fount the larger diameter I was able to move much quicker as the spring would slide much easier around the tubing. I literally completed the out coil in 20 minutes.


Then when I had about 2.5 feet left of tubing I bent another 90 matching it up with the inlet tube. I got lucky they both ended up in the same position on the coils.


So after about 2 hours and 1 blister on my index finger from spinning the spring to advance it on the 4 inch inner coil I had a finished wort chiller.


So now all that’s left is to make sure it fits how I want it to inside my brew pot. And it fit perfectly inside my brew pot. I also spent a little time spacing the coils a bit and elevating a lot of them towards the top since that’s where the most heat is. It’s all about efficiency!


PERFECT!
All that’s left to do is hose clamp on an inlet and outlet hose onto their respective ends, and my wort should be cooling in no time flat! Plus I do get a sense of accomplishment since I built it myself just remember take your time!
So the time comes in every starting brewer’s operation where ice buckets and partial boils don’t cut it anymore, and its time to do full boils and experiment with the many aspects of home brewing. And from that the need arise for a way to get their wort cooling faster. (wort is beer before you add the yeast) So the question was brought up “how do I want to cool my wort?” There are many options out there; there are immersion chillers, counter flow chillers and plate style chillers, but which one is right for me? Based purely on ease of component acquisition, assembly, and cleaning I decided I wanted an immersion chiller. Now many question come up after that, what type of metal, what size tubing, how long, configuration, make or buy? I looked at the many available options online and in my local brew shop but didn’t find the style of wort chillers I wanted. I did find one that had many features I wanted but it was oversized for my brew pot and too tall. So the choice was relatively easy I was going to make my own wort chiller. Recently copper tubing has risen in price to astounding levels almost making it equally priced as stainless steel tubing. But stainless steel is still slightly more expensive AND is not as efficient in transferring the heat as copper which is what you want for trying to get the heat out of your wort, so I decided to buy copper tubing. What size? Well a lot of the online ones made for 5 gallon batches were made from 3/8” copper tubing usually 25’ in length. Since I was already going with a 50’ coil I decided to make mine out of 1/2” because I figured with the longer coil and the design I wanted the more water volume would benefit me. I also noticed a lot of the chillers only had a large outer coil and I thought I could build a better one with a dual coil design. The basic idea behind this is simple where is the hottest part of the beer, in the center. So why would you put you main cooling element on the perimeter? My question exactly. So I wanted to build a one piece dual coil wort chiller out of refrigeration grade 1/2” copper tubing 50’ or so in length and here is how I did just that.
First I gathered all my materials I needed a 50’ coil of ½” refrigeration grade copper tubing, a form for the inner and outer coils, and a pipe bending spring as to prevent kinking which is incredibly easy to do with copper tubing. Now I was originally against purchasing the pipe bending springs because I thought I didn’t need them, but if I could recommend anything it would be to suck up and buy one because you’ll see later it pays for itself almost instantly. Oh I almost forgot you wil also need your favorite beverage to enjoy while working as this will take some time, way more time then I had planned on the inner coil alone, but it is worth it. So here’s everything laid out
Now I used a 4” diameter piece of PVC pipe and the form for my inner coil, I got extremely lucky that I picked 4 “ as this was probably the tightest coil possible using the spring set as it kept binding on this diameter any smaller and it wouldn’t have worked. So basically I started by straightening out about 2.5’ of copper to bend over the edge of the pot and to attach to my inlet and outlet hoses. Then I made a roughly 90 degree bend and started forming it to the PVC pipe.
I noticed immediately this was going to take a while as the spring had a hard time bending the tight diameter and I was constantly having to massage it around the bends. Shortly after I finished my first full bend I got a little anxious and tried to go faster. Big mistake. I had the spring slightly ahead of the bend point on the pipe and soon I pushed to form it to the pipe…KINK! $#@#!$%# expletive!
Seeing my mistake I just bent the pipe back and forth a few times till it broke off and started again now the length had been cut to about 47 feet. See my reasoning for the spring benders it was worth it! Also I noticed the spring bender was scratching my pipe! So I remedied that problem as well at this time by taking the end of the spring and flaring it out to prevent that last sharp edge form dragging along the pipe and scratching the snot out of it.
So basically the second time around I took my time and made sure the spring was covering the bend point of the tubing at all times while forcing it around the PVC pipe. And I worked my way down the pipe, basically bending a few inches at a time, removing the PVC pipe, advancing the spring, replacing the pipe and bending the next few inches, until I reached about 9 inches in height on my center coil (my brew pot is 11inches deep).Slowly but surely I worked my way to this after about 1.5 hours
And now the hard part was over! Look at the beautiful results! So my inner coil was done now I need a roughly 10-11” diameter outer coil and enough tubing left over to run the exit over the edge. I had originally planned on using a form for the outer coil as well but quickly realized without bending the straight piece I could fit it down on the coil in the proper place so I decided to free hand the outer coil. It made me nervous too because if I kin it here I mine as well throw the entire thing away and start over wasting all my hard work, time, and money. So basically I started a larger coil and measured it and adjusted it until it both centered my inner coil and measured 10.5 inches diameter. Then I just started slowly working may way up the rest of the coil constantly checking to make sure the coil was straight and maintaining diameter. I fount the larger diameter I was able to move much quicker as the spring would slide much easier around the tubing. I literally completed the out coil in 20 minutes.
Then when I had about 2.5 feet left of tubing I bent another 90 matching it up with the inlet tube. I got lucky they both ended up in the same position on the coils.
So after about 2 hours and 1 blister on my index finger from spinning the spring to advance it on the 4 inch inner coil I had a finished wort chiller.
So now all that’s left is to make sure it fits how I want it to inside my brew pot. And it fit perfectly inside my brew pot. I also spent a little time spacing the coils a bit and elevating a lot of them towards the top since that’s where the most heat is. It’s all about efficiency!
PERFECT!
All that’s left to do is hose clamp on an inlet and outlet hose onto their respective ends, and my wort should be cooling in no time flat! Plus I do get a sense of accomplishment since I built it myself just remember take your time!
Subscribe to:
Posts (Atom)